Handling API Controllers and JSON Responses in Laravel
Wednesday, February 19, 2025
// 8 min read
Table of Contents
API controllers are just stripped-down versions of resource controllers. These controllers do not have routes that only contain HTML templates, such as routes for creating and editing. Usually, if you build an API, its endpoints return a JSON, which is the standard nowadays. Luckily, Laravel has built-in support for JSON responses.
Setting Up an API Controller
I want to create an API for my existing webshop, where there is already a public page listing the products, and admins can manage these products through the admin dashboard. I need two public API endpoints, one that lists products and another showing the selected product information. Also, I want to add a restricted endpoint for authorized users to create, edit, and delete products.
You can easily create your API controller using the make:controller command along with the --api option.
php artisan make:controller API/ProductController --api --model=ProductThe --model option allows the controller to use your specified model in each method. The API/ prefix is optional, I prefer to keep a clear distinction between the web and API controllers, so I place all API-related controller classes in an API folder.
When you open the generated ProductController, you will see that it contains only 5 methods:
index
store
show
update
destroy
The create and edit methods are not present because they are unnecessary for an API.
After a bit of modification, this is how my ProductController looks like:
<?php

namespace App\Http\Controllers\API;

use App\Models\Product;
use Illuminate\Http\JsonResponse;
use App\Http\Controllers\Controller;
use App\Http\Requests\StoreProductRequest;

class ProductController extends Controller
{
    /**
     * Display a listing of the resource.
     */
    public function index(): JsonResponse
    {
        $products = Product::all();

        return response()->json($products, JsonResponse::HTTP_OK);
    }

    /**
     * Store a newly created resource in storage.
     */
    public function store(StoreProductRequest $request): JsonResponse
    {
        $data = $request->validated();

        $data['slug'] = Str::slug($request->name);
        if ($request->hasFile('image')) {
            $data['image'] = $request->file('image')->store('products', 'public');
        }

        $product = Product::create($data);

        return response()->json($product, JsonResponse::HTTP_CREATED);
    }

    /**
     * Display the specified resource.
     */
    public function show(Product $product): JsonResponse
    {
        return response()->json($product, JsonResponse::HTTP_OK);
    }

    /**
     * Update the specified resource in storage.
     */
    public function update(StoreProductRequest $request, Product $product): JsonResponse
    {
        $data = $request->validated();

        $data['slug'] = Str::slug($request->name);
        if ($request->hasFile('image')) {
            $data['image'] = $request->file('image')->store('products', 'public');
        }

        $product->update($data);

        return response()->json($product, JsonResponse::HTTP_OK);
    }

    /**
     * Remove the specified resource from storage.
     */
    public function destroy(Product $product): JsonResponse
    {
        $product->delete();

        return response()->json(null, JsonResponse::HTTP_NO_CONTENT);
    }
}
The key changes I've made besides adding the functionalities are:
returning a
JsonResponsefor every methodadding my own
StoreProductRequestForm Request class for thestoreandupdatemethods
Registering Route Resource
After your controller is ready, you need to register the API routes. You need to define them in the routes/api.php file. You can use the apiResource method, which is really similar to the Route::resource method.
Route::apiResource('products', ProductController::class);This single line automatically generates the following routes:
Method | URI | Action | Description |
|---|---|---|---|
GET |
| index | A list of products |
POST |
| store | Save a new product to database |
GET |
| show | Data of a specific post |
PUT/PATCH |
| update | Update a product in the database |
DELETE |
| destroy | Delete a product from the database |

Returning JSON Responses
By using the Laravel’s response()->json() method, my response will automatically set the Content-Type header to application/json, as well as convert the given array to JSON.
As the second parameter of the JSON response, I can pass a status code. This is important for APIs because the response handlers work on the basis of the status codes returned from them. Most people are familiar with code 200 (success), 500 (internal server error), or 404 (not found).
When you look at my example, you notice that I use predefined constants from the JsonResponse class, which uses Symfony's Response class under the hood. (so you might use that directly if you prefer: Response::HTTP_OK).
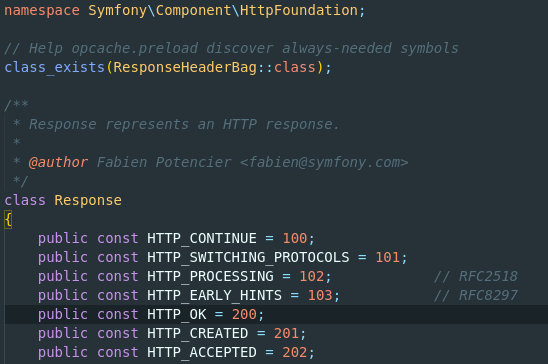
This way I do not need to memorize the numbers, for example for the store method response I need to use the 201 code which means that new data has been created, but instead I used the JsonResponse::HTTP_CREATED constants.
response()->json($product, JsonResponse::HTTP_CREATED);Manual testing API endpoints with Postman
The best way to test your API endpoints is by using Postman. It is pretty simple to use, you can just create your request in the editor, include query parameters in case of GET requests, or form-data for POST requests.
I like to create a Collection for my Projects and separate folders for each API route resource.
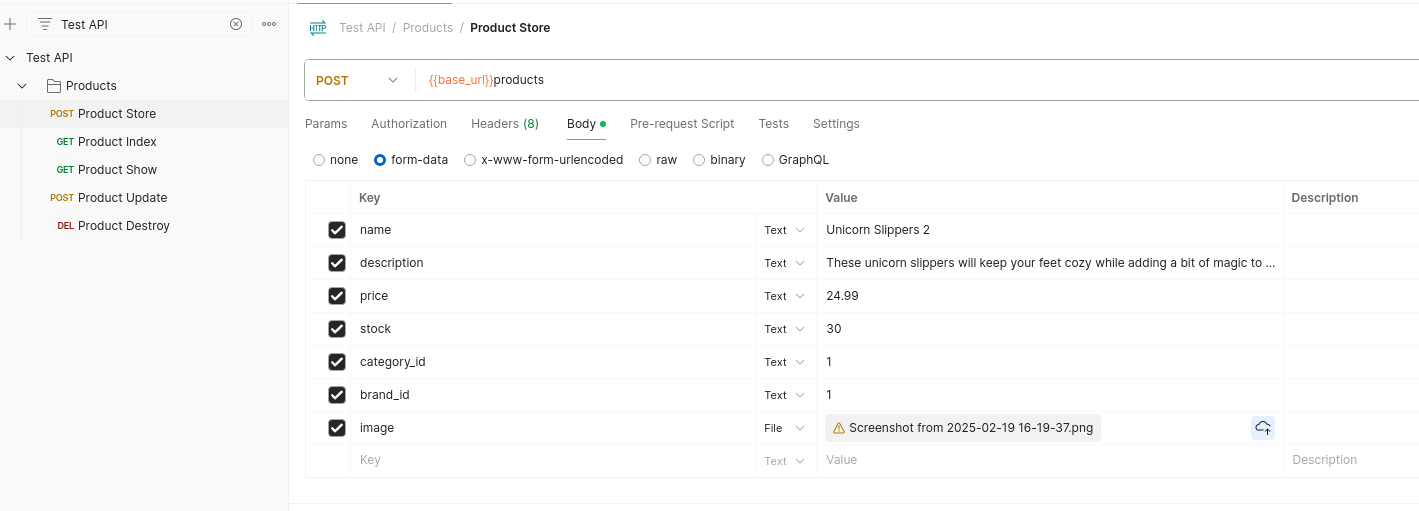
I advise you to set a base_url variable in your Collection so you do not need to include the full URL in every request, also it will be handy when you want to change the URL later.

And by calling a request, it nicely shows you its JSON response:
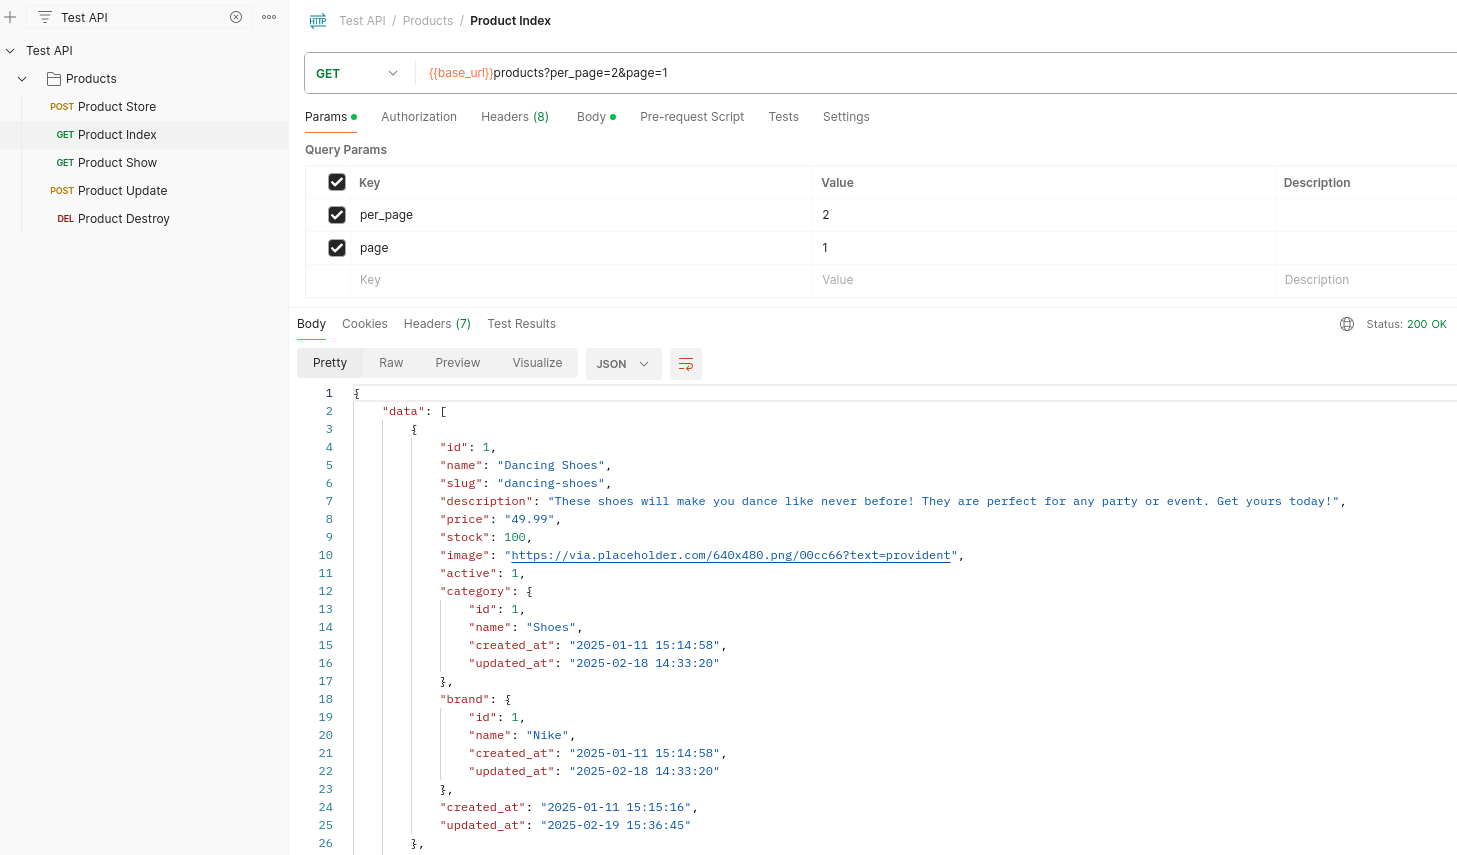
I include here my collection export if you do not want to create the requests manually: Product API Collection
Formatting responses with Resource classes
You can easily format your JSON responses with Resource classes. They are reusable, and you can show attributes based on conditions. I am not going to go in-depth here, just give you the basics.
Let's create a Resource for our Product model:
php artisan make:resource ProductResourceThe command above generates the following class:
<?php

namespace App\Http\Resources;

use Illuminate\Http\Request;
use Illuminate\Http\Resources\Json\JsonResource;

class ProductResource extends JsonResource
{
    /**
     * Transform the resource into an array.
     *
     * @return array<string, mixed>
     */
    public function toArray(Request $request): array
    {
        return parent::toArray($request);
    }
}
You need to customize the array of attributes returned by the toArray method. This is what mine looks like after the edits:
<?php

namespace App\Http\Resources;

use Illuminate\Http\Request;
use Illuminate\Http\Resources\Json\JsonResource;

class ProductResource extends JsonResource
{
    /**
     * Transform the resource into an array.
     *
     * @return array<string, mixed>
     */
    public function toArray(Request $request): array
    {
        return [
            'id' => $this->id,
            'name' => $this->name,
            'slug' => $this->slug,
            'description' => $this->whenNotNull($this->description),
            'price' => $this->whenNotNull(number_format($this->price, 2)),
            'stock' => $this->whenNotNull($this->stock),
            'image' => $this->whenNotNull($this->image),
            'active' => $this->whenNotNull($this->active),
            'category' => new CategoryResource($this->whenLoaded('category')),
            'brand' => new BrandResource($this->whenLoaded('brand')),
            'created_at' => $this->whenNotNull($this->created_at?->format('Y-m-d H:i:s')),
            'updated_at' => $this->whenNotNull($this->updated_at?->format('Y-m-d H:i:s')),
        ];
    }
}
I added all the attributes and related models that are present in my Product model. You might notice the whenNotNull helper method that helps remove attributes without values, this way we can reduce the size of the of our JSON response returns. So one Product object might return only the following attributes if all the other values are NULL:
{
    "id": 5,
    "name": "Unicorn Slippers",
    "slug": "unicorn-slippers",
}
You can also reference other resources, this is useful in case you want to load related model values or collections. In my case, one Product has a related Category and Brand model, and I've created a Resource for each.
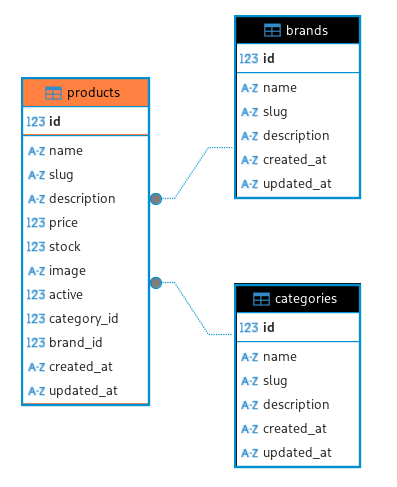
The whenLoaded method checks if you loaded the relationship beforehand, and if you did that, then it loads the related resource.
new CategoryResource($this->whenLoaded('category')),After your resource class is set, you can use it in your Controller. Also, I needed to make minor changes in my Eloquent queries:
public function index(): JsonResponse
{
    $products = Product::with(['category', 'brand'])->get();

    return response()->json(
        ProductResource::collection($products),
        JsonResponse::HTTP_OK
    );
}
I also included Resource class inside the store, show, and update methods:
$product->load(['category', 'brand']);

return response()->json(
    new ProductResource($product),
    JsonResponse::HTTP_OK
);
Notice the with scope that eager loads the category and brand relationships. This means that after querying the Products, another two queries run to retrieve all the categories and all the brands for all the products:
select * from products
select * from categories where id in (1, 2, 3, 4, 5, ...)
select * from brands where id in (1, 2, 3, 4, 5, ...)
I recommend always using eager loading whenever you can to avoid duplicated queries.
For example, if I just revert to my original query that does not use eager loading and remove the $this->whenLoaded extra check in my Resource class in front of each relationship reference and call my products endpoint, then my executed queries are going to be the following:

The categories and brands select queries are duplicated as many times as many products I have in the database, so in my case the same queries run 4 times.
Handling API Requests and Validations
Validating JSON requests is important. But you need to return the validation errors with the right HTTP status code which for Unprocessable Content is 422.
The Laravel validation method handles the validation logic, but you need to do an extra set-up in your Handler to return the response with the error messages. You can do this inside your bootstrap/app.php file by adding an exception for all the routes that start with api/:
->withExceptions(function (Exceptions $exceptions) {
    $exceptions
        ->render(function (ValidationException $e, Request $request) {
            if ($request->is('api/*')) {
                return response()->json([
                    'message' => 'The given data was invalid.',
                    'errors' => $e->errors()
                ], 422);
            }
        });
})
Now, in case of any validation error, the endpoint returns a JSON response with the error messages.
{
    "message": "The given data was invalid.",
    "errors": {
        "price": [
            "The price field is required."
        ],
        "image": [
            "The product image is required."
        ],
        "brand_id": [
            "The brand id field is required."
        ]
    }
}
I recommend that you use FormRequest classes for more complex validations, which I am doing in this example.
php artisan make:request ProductRequestAnd this is how my Form request class looks like:
<?php

namespace App\Http\Requests;

use App\Models\Product;
use App\Models\Category;
use Illuminate\Validation\Rule;
use Illuminate\Foundation\Http\FormRequest;

class StoreProductRequest extends FormRequest
{
    /**
     * Determine if the user is authorized to make this request.
     */
    public function authorize(): bool
    {
        if ($this->isMethod('POST')) {
            return $this->user()->can('create', Product::class);
        }

        return $this->user()->can('update', $this->product);
    }

    /**
     * Get the validation rules that apply to the request.
     *
     * @return array<string, \Illuminate\Contracts\Validation\ValidationRule|array<mixed>|string>
     */
    public function rules(): array
    {
        $productId = $this->route('product') ? $this->route('product')->id : null;

        return [
            'name' => 'required|string|max:100|unique:products,name,' . $productId,
            'description' => 'required|string|max:1500',
            'stock' => [
                'required',
                'integer',
                'min:0',
                function ($attribute, $value, $fail) {
                    if ($this->input('active') && $value == 0) {
                        $fail('The stock must be greater than 0 when the product is active.');
                    }
                }
            ],
            'price' => 'required|numeric|min:0',
            'image' => [
                $this->isMethod('POST') ? 'required' : 'nullable',
                'image',
            ],
            'category_id' => 'required|exists:categories,id',
            'brand_id' => 'required|exists:brands,id',
            'active' => 'nullable|boolean',
        ];
    }
}
I wrote an entire blog post about Request Validation in Laravel Controllers if you want to have a more in-depth explanation.
I recommend creating an exception for Page Not Found and Internal Server error, too. You can later override these in your controller with a try-catch if necessary.
$exceptions
    ->render(function (NotFoundHttpException $e, Request $request) {
        if ($request->is('api/*')) {
            return response()->json([
                'message' => 'Record not found.'
            ], 404);
        }
    })
    ->render(function (\Throwable $e, Request $request) {
        if ($request->is('api/*')) {
            return response()->json([
                'message' => 'Internal Server Error',
                'error' => $e->getMessage(),
                'file' => $e->getFile() . ':' . $e->getLine(),
                'trace' => $e->getTrace()
            ], 500);
        }
    });
Pagination in API Responses
It depends on your amount of data, but you will need to offer a paginated version of your data set, after a certain number of database rows it is even necessary to put restrictions on querying data to speed up your API responses.
You can use the paginate method for this. Your collection will contain information about the paginator's state.
public function index(Request $request): JsonResponse
{
    $products = Product::paginate($request->input('per_page', 10));

    return response()->json(
        [
            'data' => ProductResource::collection($products),
            'pagination' => [
                'total' => $products->total(),
                'count' => $products->count(),
                'per_page' => $products->perPage(),
                'current_page' => $products->currentPage(),
                'total_pages' => $products->lastPage(),
            ],
        ],
        JsonResponse::HTTP_OK
    );
}
Notice, that I included a Request parameter so we can tell the paginator which page should query and how many items should be included per page.
http://localhost:8000/api/products?per_page=10&page=2Example result:
{
    "data": [
        {
            "id": 1,
            "name": "Dancing Shoes",
            "slug": "dancing-shoes",
            "description": "These shoes will make you dance like never before! They are perfect for any party or event. Get yours today!",
            "price": "49.99",
            "stock": 100,
            "image": "https://via.placeholder.com/640x480.png/00cc66?text=provident",
            "active": 1,
            "category": {
                "id": 1,
                "name": "Shoes",
                "created_at": "2025-01-11 15:14:58",
                "updated_at": "2025-02-18 14:33:20"
            },
            "brand": {
                "id": 1,
                "name": "Nike",
                "created_at": "2025-01-11 15:14:58",
                "updated_at": "2025-02-18 14:33:20"
            },
            "created_at": "2025-01-11 15:15:16",
            "updated_at": "2025-02-18 14:33:20"
        },
        {
            "id": 2,
            "name": "Donut Pillow",
            "slug": "donut-pillow",
            "description": "This donut pillow is perfect for anyone who loves donuts! It is soft, squishy, and smells like a real donut. Get yours today!",
            "price": "19.99",
            "stock": 50,
            "image": "https://via.placeholder.com/640x480.png/009988?text=et",
            "active": 1,
            "category": {
                "id": 4,
                "name": "Home",
                "created_at": "2025-01-11 15:14:58",
                "updated_at": "2025-02-18 14:33:20"
            },
            "brand": {
                "id": 10,
                "name": "Home",
                "created_at": "2025-01-11 15:14:58",
                "updated_at": "2025-02-18 14:33:20"
            },
            "created_at": "2025-01-11 15:15:16",
            "updated_at": "2025-02-18 14:33:20"
        }
    ],
    "pagination": {
        "total": 4,
        "count": 2,
        "per_page": 2,
        "current_page": 1,
        "total_pages": 2
    }
}
API Authentication & Authorization
To restrict access to API endpoints for users, it's essential to implement authentication in your API. Fortunately, there are prebuilt packages available for Laravel that help this process. I am currently using Breeze, and you can follow the installation steps provided here in the Breeze documentation.
If your application only offers API endpoints, you can choose the "API only" stack. However, since my application also features a frontend built with Livewire that includes login and registration forms, the API is primarily intended for granting access to third-party users. For this reason, I need to create a separate authentication controller specifically for API users. If you choose the API only stack, you might skip this step.
<?php

namespace App\Http\Controllers\API;

use App\Models\User;
use Illuminate\Http\Request;
use Illuminate\Http\JsonResponse;
use App\Http\Controllers\Controller;
use Illuminate\Support\Facades\Auth;
use Illuminate\Support\Facades\Hash;
use Illuminate\Validation\ValidationException;

class AuthController extends Controller
{
    public function login(Request $request): JsonResponse
    {
        $request->validate([
            'email' => 'required|email',
            'password' => 'required',
        ]);

        if (!Auth::attempt($request->only('email', 'password'))) {
            throw ValidationException::withMessages([
                'email' => ['The provided credentials are incorrect.'],
            ]);
        }

        $user = User::where('email', $request->email)->first();
        $token = $user->createToken('api-token')->plainTextToken;

        return response()->json([
            'token' => $token,
            'user' => $user,
        ]);
    }

    public function register(Request $request): JsonResponse
    {
        $request->validate([
            'name' => 'required|string|max:255',
            'email' => 'required|string|email|max:255|unique:users',
            'password' => 'required|string|min:8|confirmed',
        ]);

        $user = User::create([
            'name' => $request->name,
            'email' => $request->email,
            'password' => Hash::make($request->password),
        ]);

        $token = $user->createToken('api-token')->plainTextToken;

        return response()->json([
            'token' => $token,
            'user' => $user,
        ], JsonResponse::HTTP_CREATED);
    }

    public function logout(Request $request): JsonResponse
    {
        $request->user()->currentAccessToken()->delete();

        return response()->json(null, JsonResponse::HTTP_NO_CONTENT);
    }
}
Do not forget to add HasApiTokens to the User model:
<?php

namespace App\Models;

use Laravel\Sanctum\HasApiTokens;
use Illuminate\Notifications\Notifiable;
use Illuminate\Database\Eloquent\Factories\HasFactory;
use Illuminate\Foundation\Auth\User as Authenticatable;

class User extends Authenticatable
{
    use HasFactory, Notifiable, HasApiTokens;
    ....
}
And create your API routes:
// Auth routes
Route::post('login', [AuthController::class, 'login']);
Route::post('register', [AuthController::class, 'register']);

// Protected routes
Route::middleware('auth:sanctum')->group(function () {
    Route::get('/user', function (Request $request) {
        return $request->user();
    });

    Route::post('logout', [AuthController::class, 'logout']);
});
And you can test the login with postman:
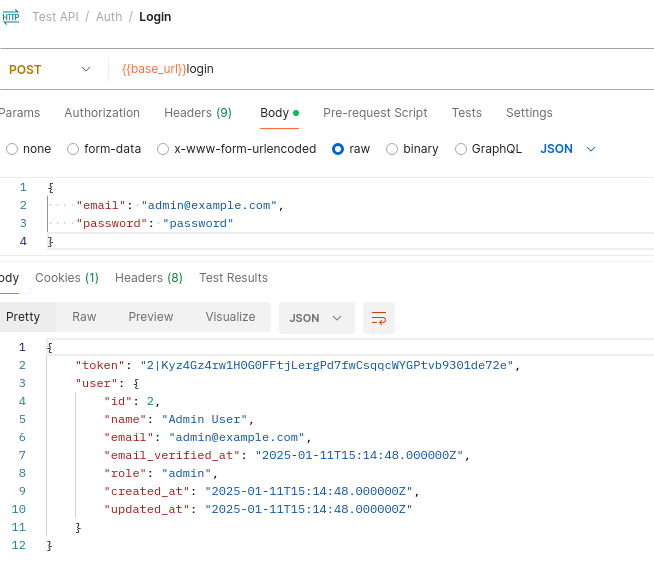
You will notice that the response includes a token, which you will need for any requests requiring authentication. For instance, to create a new product, you must be logged in as an admin user. First, copy the token. Then, add a new variable to your collection named token. In the value field, type Bearer (which indicates the type of token) followed by the actual token you copied.

Finally, include an Authorization header in your request, with the value set to {{token}}.

Then you should be able to create a new Product with the authenticated user. You might do this for other requests which need Authentication.
API versioning
It is generally a good practice to add versioning to your API endpoints for maintainability.
It is fairly simple to do that in your routes/api.php:
// Version 1 API Routes
Route::prefix('v1')->group(function () {
    // Auth routes
    Route::post('login', [AuthController::class, 'login']);
    Route::post('register', [AuthController::class, 'register']);

    // Protected routes
    Route::middleware('auth:sanctum')->group(function () {
        Route::get('/user', function (Request $request) {
            return $request->user();
        });

        Route::post('logout', [AuthController::class, 'logout']);
    });

    Route::apiResource('products', ProductController::class);
});http://localhost:8000/api/v1/productsCertainly, you need to either create new controllers for different versions or manage the processing of both older and newer versions inside the same controller.
These were the key points you needed to know about API controllers. There is always room for improvement. For instance, I would improve the code by introducing a Service layer and move the Eloquent queries there.
If you want to support my work, you can donate using the button below. Thank you!